Step 1: Define the Product
First, create a single “Product” to act as a container for all of ElevenLabs’ plans and features.- From the side navigation menu, navigate to Product Catalog > Products.
- Click the + Create product button.
- Fill in the product details:
- Product name:
ElevenLabs AI Speech Services - Identifier:
product-elevenlabs-ai-speech - Subscription type: Select Single active subscription.
- Product name:
- Click Create.
Step 2: Create Billable Features
Next, define the core features. These will be used to grant access and set limits within each subscription plan.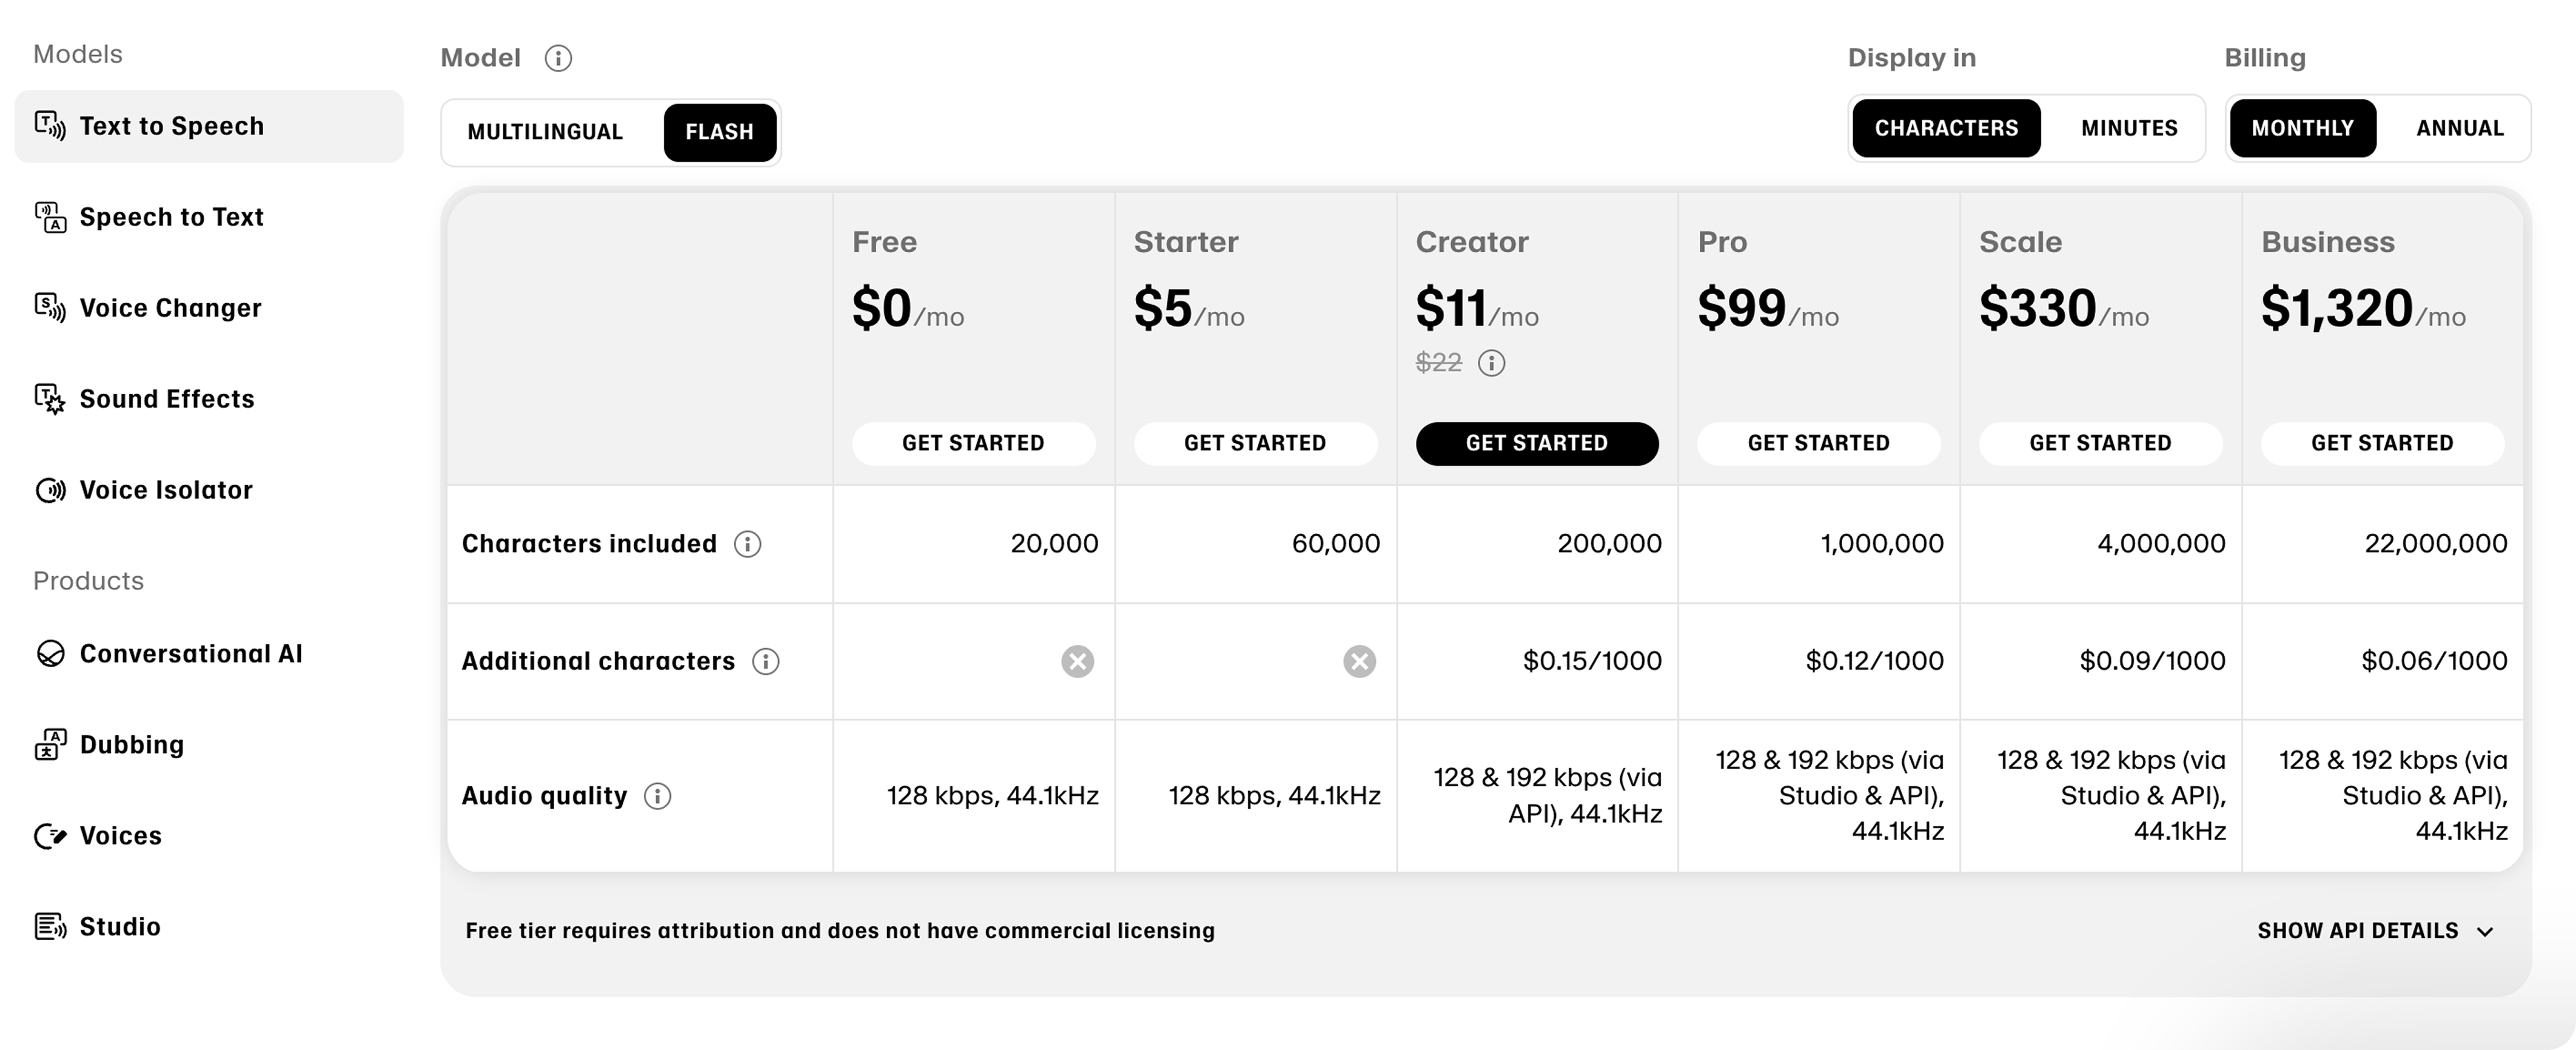
Feature A: Characters Generated (Metered)
Feature A: Characters Generated (Metered)
This feature tracks the primary usage metric. We use a
Raw metered type, assuming your application sends an event with a character_count each time speech is generated.- Click + Create feature.
- Fill in the details:
- Feature name:
Characters Generated - Feature type:
Meter>Raw - Feature unit:
Character/Characters
- Feature name:
- Click Continue.
- Define Event Filters: Set a filter where
event nameequalsspeech.generated. - Configure Aggregation: Select
Sumover the event propertycharacter_count. - Click Create.
Feature B: Custom Voice Slots (Customizable)
Feature B: Custom Voice Slots (Customizable)
This feature defines the number of custom voices a user can create. We use the
Customizable type to set a specific quantity limit per plan.- Click + Create feature.
- Fill in the details:
- Feature name:
Custom Voice Slots - Feature type:
Customizable - Feature unit:
Custom Voice Slot/Custom Voice Slots
- Feature name:
- Click Create.
Feature C: Professional Voice Cloning (Switch)
Feature C: Professional Voice Cloning (Switch)
This feature grants access to the advanced Professional Voice Cloning tool. We use a
Switch/Boolean type as it’s either enabled or disabled for a plan.- Click + Create feature.
- Fill in the details:
- Feature name:
Professional Voice Cloning - Feature type:
Switch/boolean
- Feature name:
- Click Create.
Step 3: Design and Configure Pricing Plans
Now, create the subscription plans based on the latest tiers from the ElevenLabs pricing page.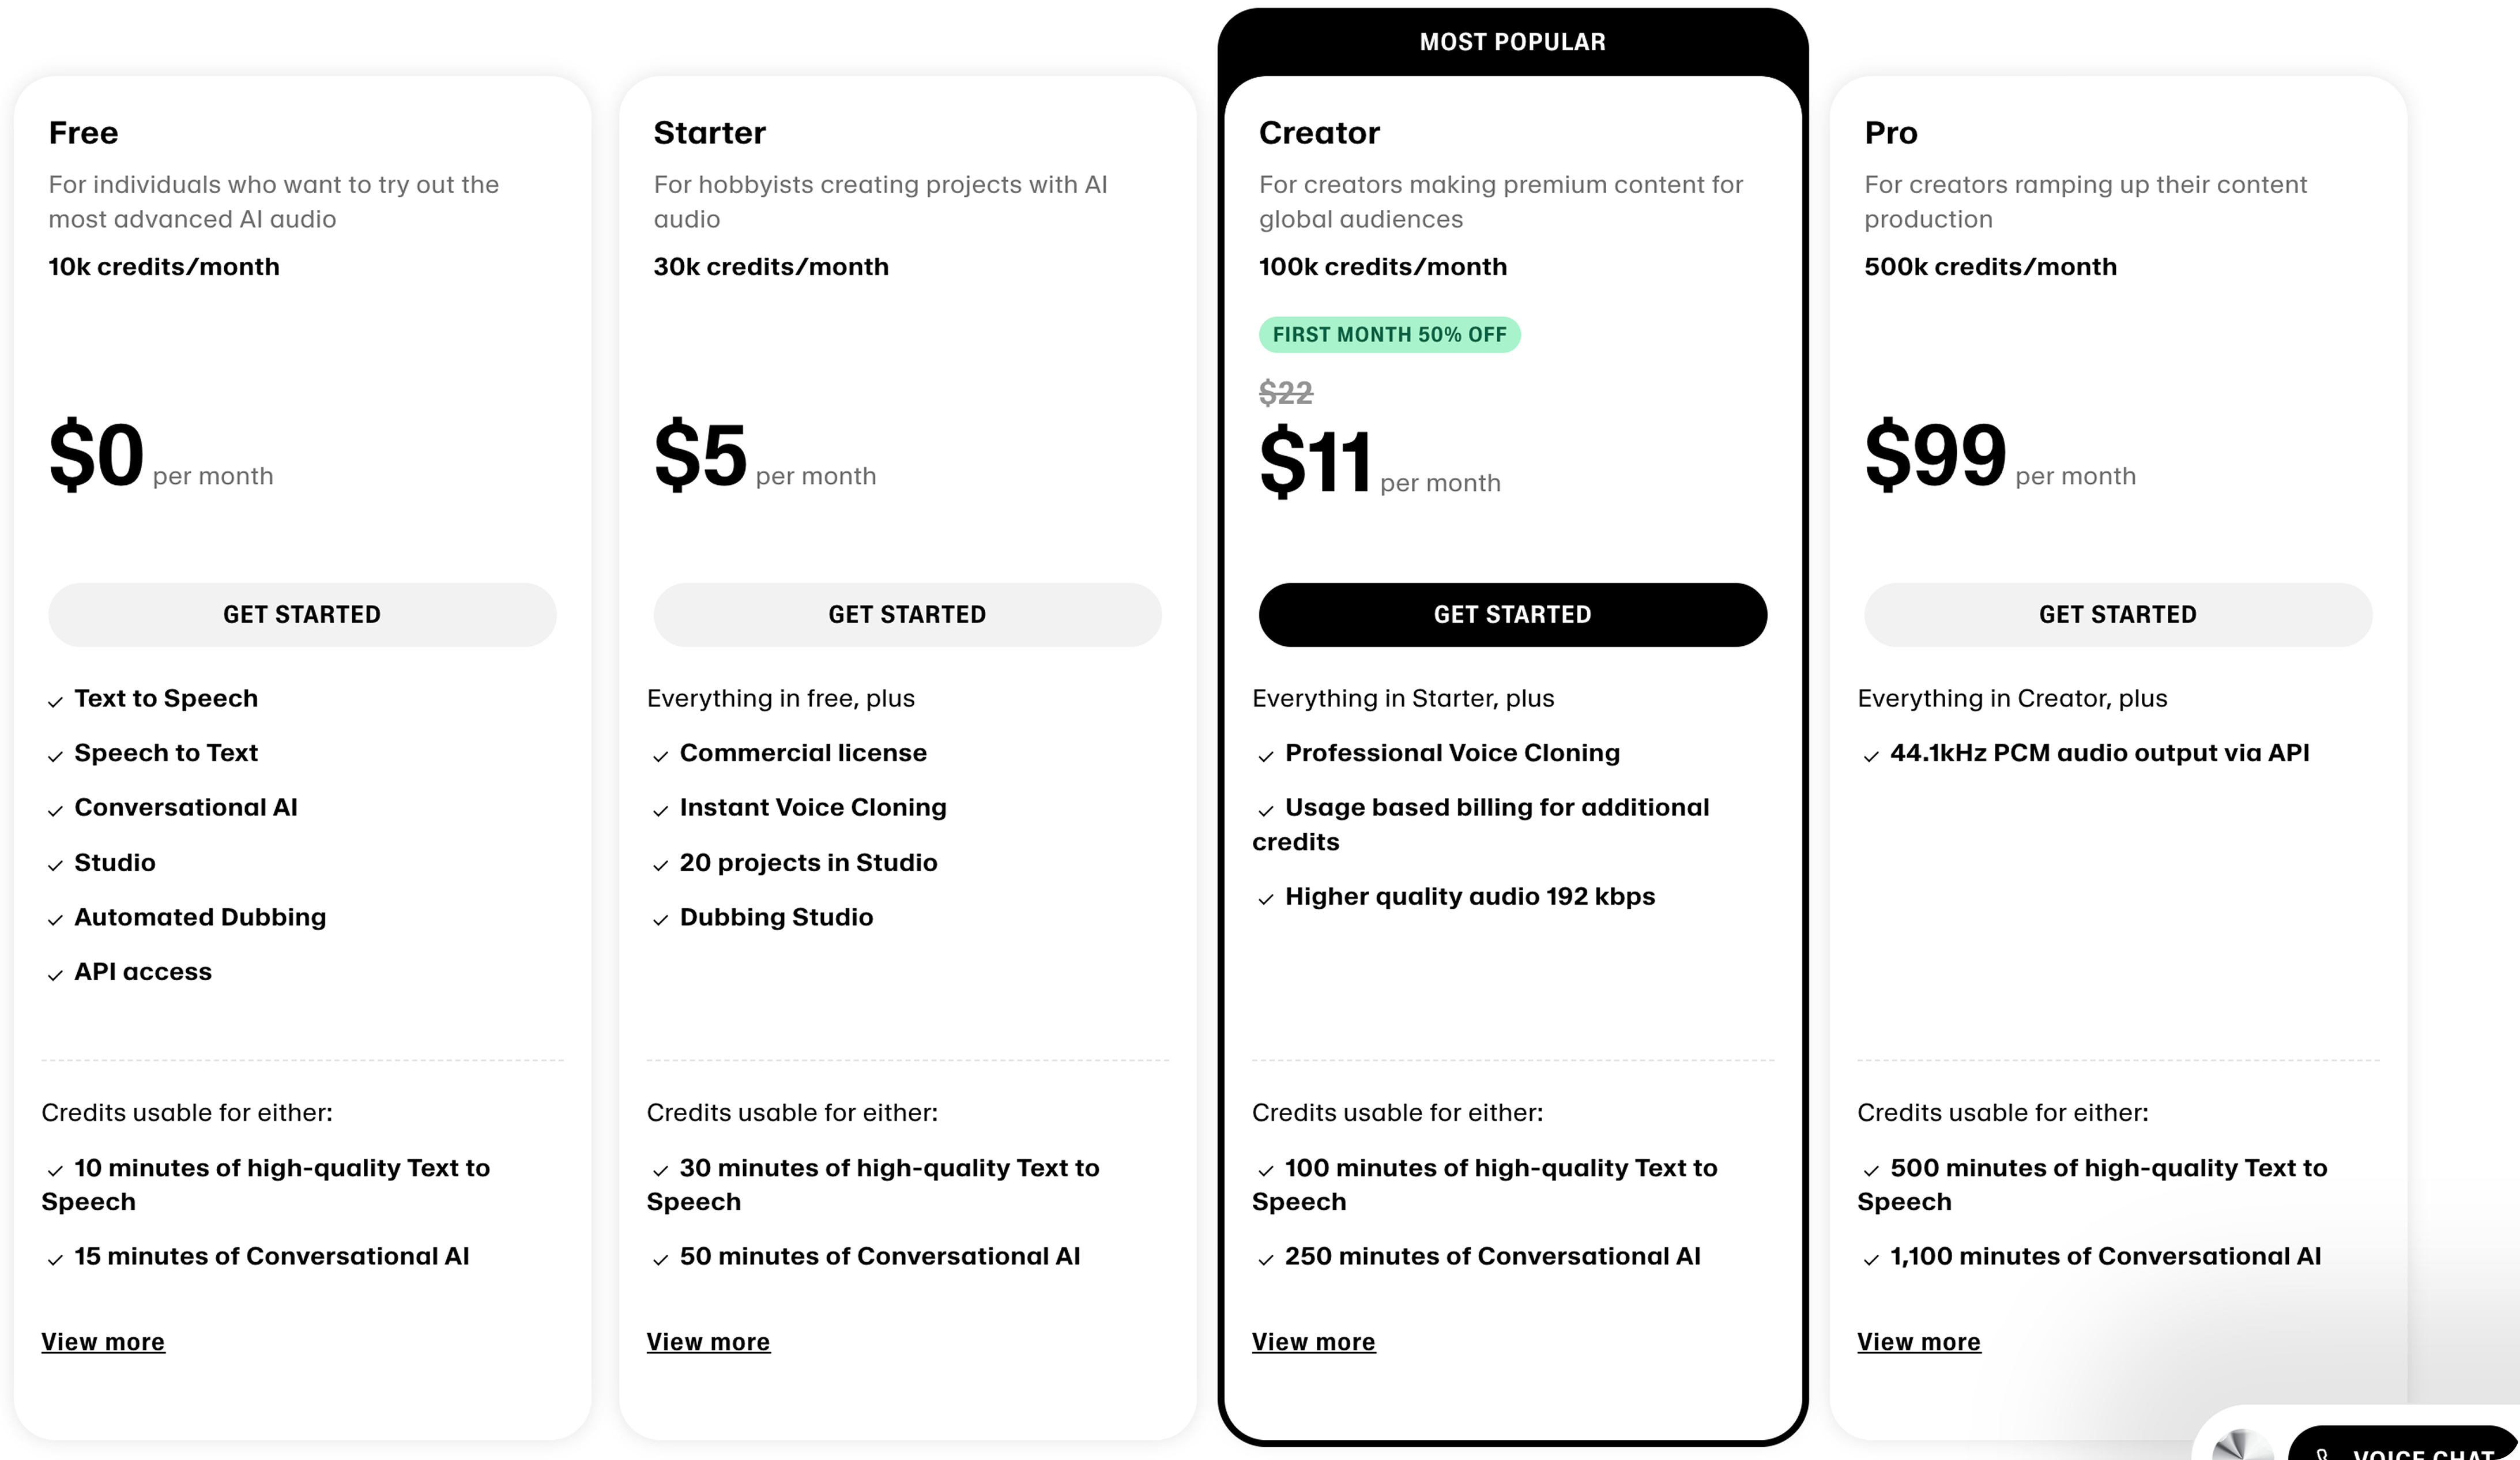
- Plan A: Free
- Plan B: Starter
- Plan C: Creator
1. Create the Plan
- On the product page, click + Create plan.
- Enter the details:
- Plan name:
Free - Description:
For hobbyists who want to try out speech synthesis.
- Plan name:
- Click Create.
2. Configure Pricing & Entitlements
The Free tier has no charge and a hard limit on characters.- On the
Freeplan page, click Set price and select the plan type Free. - Navigate to the Feature entitlements section of the plan.
- Click + Add and select the Characters Generated feature. Configure its hard limit:
- Usage limit:
10000 - Ensure the “Soft limit” toggle is OFF.
- Usage reset:
Monthly
- Usage limit:
- Click + Add again and select Custom Voice Slots:
- Usage limit:
0
- Usage limit:
- Save the entitlements, then Publish the plan.
Step 4: Configure an Introductory Free Trial
To provide an introductory offer, you can use the built-in Free Trial feature. This provides a$0 first month, which is a powerful incentive for new users to try a paid plan.
Here’s how to add a 30-day free trial to the Starter plan. You can repeat these steps for the Creator plan.
- Navigate to the
Starterplan page and click to Edit price. - In the pricing configuration screen, check the box to Provide free trial.
- Set the Trial period to
30and selectdaysfrom the dropdown. - Configure the desired action for when the trial ends without a payment method (e.g., “Downgrade to free plan”).
- Save the updated pricing configuration. New users subscribing to this plan will now automatically receive a 30-day free trial before standard billing begins.
Step 5: Design the Pricing Table and Activate
Finally, create a pricing table to present the plans and activate it with an Offering.- Navigate to Monetization > Pricing table and click + Create Pricing Table.
- In the Configuration tab, connect the
ElevenLabs AI Speech Servicesproduct. - In the Content tab, arrange your plans (
Free,Starter,Creator) and customize the display text for features and limits. - Navigate to Monetization > Offerings and click + Create offering.
- Select the pricing table you just designed to link it to the product.
- Click Create and use the generated Offering ID in your application to render the pricing table.